

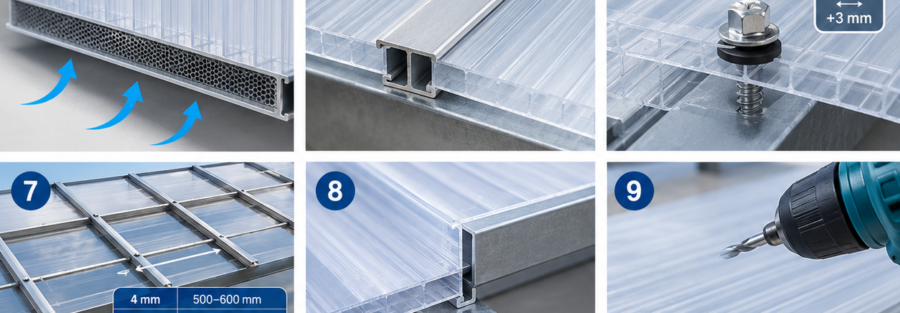
Knowing how to install polycarbonate roofing sheets correctly comes down to five rules: a minimum slope of 5°, flutes running down the slope, the UV side facing the sun, room for thermal expansion, and screws that are not over-tightened. Follow them and the roof lasts for years without leaks, yellowing or cracks; ignore one and the problem usually shows up in the first summer. This guide walks through each step, gives purlin spacing by thickness, explains when to use H, HCP or U profiles, and lists the mistakes behind most failures on site.
Updated October 2026 · Reviewed by the technical team at G-Crystal Plastic Industries, polycarbonate sheet manufacturer.
In short:
- Minimum slope of 5° (about 9%), with the flutes running down the slope.
- Solid aluminium tape at the top end, vented tape at the bottom, and a U profile over both.
- Drill holes about 3 mm larger than the screw and at least 40 mm from the edge.
- Leave about 3 mm of clearance per metre: polycarbonate expands more than seven times as much as glass.

What you need to install polycarbonate roofing sheets
| Item | What it is for |
|---|---|
| Twin-wall sheet or solid sheet | The roof itself. Order sheets in the full roof length: multiwall sheet cannot be butt-jointed end to end |
| H or HCP connecting profiles | Joining sheets side by side |
| U profile | Closing the ends of multiwall sheet |
| Solid aluminium tape | Sealing the flutes at the top end |
| Vented (anti-dust) tape | Sealing the bottom end while letting condensation escape |
| Self-tapping screws with EPDM washers | Fixing the sheet, or the HCP base, to the purlins |
| Low-modulus neutral silicone | Sealing flashings; never acid-cure silicone or solvent-based sealants |
| Fine-tooth circular saw or jigsaw, drill with metal bits | Cutting and drilling |
Do not use PVC profiles: their plasticisers attack polycarbonate.
How to install polycarbonate roofing sheets by profile: H, HCP or U
| Profile | What it looks like | When to use it |
|---|---|---|
| H profile | One piece shaped like an H; each sheet slides in from one side | Canopies, façades, partitions and small roofs where the structure already supports the sheet |
| HCP profile | Two pieces: a base screwed to the purlin and a cap that snaps down over the sheets | Large roofs, greenhouses and windy sites: it clamps the sheet mechanically and adds structural support |
| U profile | One U-shaped piece | Closing the top and bottom ends of multiwall sheet, over the tape |
A practical rule: if the joint between sheets sits on a purlin and the roof faces strong wind, use HCP. If the frame already carries the sheet and you only need to join it, H is simpler and cheaper.
Roof design rules before you install polycarbonate roofing sheets
- Minimum slope of 5°. That is about 9 cm of fall per metre. Flatter roofs hold water, stain, and let water into the flutes.
- Flutes run down the slope. On multiwall sheet, the channels must run from top to bottom so that condensation drains out at the lower end. Never horizontal on a roof.
- Full-length sheets. Multiwall sheet is not overlapped or butt-jointed end to end. If the roof is 5 m, order 5 m sheets or cut them from 5.8 m or 6 m sheets.
- UV side to the sun. It is marked on the protective film. Installed upside down, the sheet yellows within a few years. G-Crystal sheets have a co-extruded UV layer on one or both sides.
- Purlin spacing by thickness. These are typical market values for multiwall sheet under moderate wind load. On exposed coastal sites or in heavy-hail areas, reduce the spacing or go up a thickness.
| Multiwall sheet thickness | Typical purlin spacing |
|---|---|
| 4 mm | 500–600 mm |
| 6 mm | 600–750 mm |
| 8 mm | 750–900 mm |
| 10 mm | 900–1,050 mm |
For engineered projects, ask us for a recommendation based on the design wind load for your site.
Step by step: how to install polycarbonate roofing sheets
1. Store correctly. Keep sheets flat, covered and in the shade. Protective film left in the sun for weeks bonds to the surface.
2. Measure and cut. Cut with a fine-tooth blade at high speed and slow feed, with the sheet fully supported so it does not vibrate. Then blow out or vacuum the flutes to remove swarf. See our guide on how to cut polycarbonate sheets.
3. Drill with clearance. Make holes about 3 mm larger than the screw and at least 40 mm from the edge, so the sheet can move with heat without cracking around the screw.
4. Seal the ends. Peel back about 5 cm of film at the edges. Apply solid aluminium tape to the top end and vented tape to the bottom end. Fit a U profile over each tape, and drill small weep holes in the bottom U profile so condensation can drain.
5. Place the first sheet. UV side up and flutes down the slope, resting on the purlins with clearance in the side profiles.
6. Join the sheets. With an H profile, insert each sheet about 20 mm and leave free space at the bottom of the profile for expansion. With an HCP profile, screw the base to the purlin first, lay both sheets on it with their clearance, then snap the cap down.
7. Fix with screws. Use a screw with an EPDM washer at each purlin crossing. Tighten only until the washer seals: if the sheet dips, it is too tight. At the eaves purlin, add extra fixings against wind uplift.
8. Seal the flashings. At wall abutments and caps, use neutral silicone that is compatible with polycarbonate.
9. Remove the film. Once installation is complete, not before and not weeks later.
10. Check. Make sure no sheet is forced in its profiles and that water runs freely to the gutter.
How to install solid polycarbonate sheet in windows and frames
Solid sheet is usually fitted inside a frame, in windows, security openings and partitions, rather than on purlins like a roof. The rules change slightly:
- Edge engagement. Because the sheet flexes more than glass, its edge must sit deep enough in the profile that wind cannot pull it out.
- Clearance on every side. Leave about 3 mm per metre in length and width between the sheet edge and the bottom of the frame; never cut the sheet to the exact size of the opening.
- EPDM gaskets on both faces. They hold the sheet and let it move. Do not use PVC gaskets.
- Thickness by pane size. As a guide: 3–4 mm up to 0.5 m², 4–6 mm up to 1.5 m², 6–8 mm for larger panes or with a mid-support, and 8–10 mm where break-in or vandal resistance matters.
- If you screw the sheet directly, apply the same oversized-hole and edge-distance rules.
This is the right method when polycarbonate replaces glass in schools, warehouses, factories and guard houses.
How to install polycarbonate on canopies and pergolas
For canopies, carports and covered walkways the steps are the same, with three additions. First, keep a slope even on small canopies; never fit the sheet dead flat. Second, the free edges of a canopy are the first thing the wind grabs, so secure them with a profile or extra screws. Third, on curved canopies, respect the bending radius in the table below and run the flutes along the curve.
Thermal expansion: the detail behind most failures
According to our technical data sheet, polycarbonate expands 6.8 × 10⁻⁵ per °C, more than seven times as much as glass. A 2 m sheet with a 50 °C swing between night and midday grows by about 6.8 mm. If the screw or the profile does not leave room, the sheet buckles or cracks around the fixings.
That is why the 3 mm per metre clearance and oversized holes are not optional. In the Gulf and the Sahel, where day–night swings are large, they matter even more.
Curved roofs: minimum bending radius
Polycarbonate is cold-bent on site, without heating. What you cannot do is go below the minimum radius, because the sheet is left with permanent stress. We use the most conservative market values; for more on curving sheets, see our guide to bendable plastic sheeting.
| Thickness | Multiwall (175 × thickness) | Solid (150 × thickness) |
|---|---|---|
| 3 mm | — | 450 mm |
| 4 mm | 700 mm | 600 mm |
| 6 mm | 1,050 mm | 900 mm |
| 8 mm | 1,400 mm | 1,200 mm |
| 10 mm | 1,750 mm | 1,500 mm |
On multiwall sheet, always bend along the flutes, never across them.
8 common mistakes when you install polycarbonate roofing sheets
- UV side facing down. The sheet yellows and turns brittle.
- Screws over-tightened. They block expansion and crack the sheet.
- Holes the exact size of the screw. Same problem: the sheet cannot move.
- Horizontal flutes on a roof. Water and dust stay inside.
- Open, unsealed ends. Dust, insects and mould get in and the sheet looks dirty from inside.
- Acid-cure silicone or PVC profiles. They attack polycarbonate chemically.
- Walking directly on the sheet. Use crawling boards laid across the purlins.
- Film left in the sun for weeks. It will not come off cleanly afterwards.
How to install polycarbonate roofing sheets in African and Gulf conditions
Heat and strong sun. Full expansion clearance is essential. Under roofs and skylights that people sit beneath, bronze or opal sheets cut glare and heat gain.
Dust, sand and harmattan. Seal both ends properly and use vented tape, never leave flutes open. Rinse with plenty of water before wiping; dry-wiping sand scratches the surface.
Tropical rain. On coastal sites such as Lagos, Accra or Mombasa, keep at least the 5° slope, use HCP profiles fixed to every purlin, and add extra fixings at the eaves and edges.
Greenhouses. For farm structures, see polycarbonate greenhouse panels: twin-wall sheet of 4–10 mm with sealed ends gives insulation and diffused light.
Checklist before handing over the roof
Before you hand the roof to the client, run through these points:
- Protective film fully removed, UV side up.
- All ends sealed with tape and U profile, weep holes open.
- Screws evenly tightened; no sheet dips under any screw.
- Sheets move slightly in their profiles; none is forced or buckled.
- No swarf left inside the flutes.
- All water runs to the gutter, with no ponding anywhere.
Maintenance
Wash with lukewarm water, mild soap and a soft cloth, always starting with plenty of water to lift the dust. No abrasive pads, ammonia or solvents. Once a year, check screws, profiles and tapes, especially after the rainy season.
How long does a correctly installed polycarbonate roof last?
Roof life depends on two things: the quality of the sheet and how you install polycarbonate roofing sheets. A sheet with a co-extruded UV layer, installed UV side up with correct expansion clearances and sealed ends, typically lasts 10 years or more outdoors. A sheet fitted upside down or screwed too tight can yellow or crack within two or three seasons. Alongside G-Crystal’s 10-year limited warranty against defects in material and workmanship, simple yearly maintenance keeps the roof in shape: replace any damaged washer and re-fix any tape that has lifted from the ends.
From the factory
G-Crystal sheets are rated for service from −40 °C to +120 °C, classified B1 (DIN 4102) and UL 94 V-2, carry a co-extruded UV layer, and come with a 10-year limited warranty against defects in material and workmanship. Twin-wall sheet is produced up to 10 mm and in custom lengths. What we see from the plant floor is consistent: almost every site complaint comes from installation, not from the sheet. That is why we wrote this guide on how to install polycarbonate roofing sheets.
If you are still choosing between polycarbonate and glass, read polycarbonate as a glass alternative first. For roofing products, see polycarbonate roofing sheets.
FAQ: how to install polycarbonate roofing sheets
What is the minimum slope for a polycarbonate roof? 5°, about 9 cm of fall per metre. Flatter than that, water ponds on the sheet.
Can multiwall polycarbonate sheets be overlapped? No. Multiwall sheets are joined side by side with H or HCP profiles and ordered in the full roof length.
What screws should I use for polycarbonate roofing? Self-tapping screws with EPDM washers, in holes about 3 mm larger than the screw, tightened only until the washer seals.
What purlin spacing do I need? It depends on thickness and wind load. As a guide, from 500–600 mm for 4 mm up to 900–1,050 mm for 10 mm multiwall sheet.
What thickness is best for a polycarbonate roof in hot climates? For average roofs and canopies, 6 or 8 mm twin-wall is the most common choice. On exposed coastal sites or large spans, use 10 mm with HCP profiles.
Do I need silicone at every screw? No. The EPDM washer seals the screw when it is tightened correctly. Silicone is only for wall abutments and flashings.
Can I walk on polycarbonate roofing? Not directly. Lay boards across the purlins to spread the load.
Which silicone is safe for polycarbonate? Low-modulus neutral-cure silicone that is approved for polycarbonate. Acid-cure silicone, the kind that smells of vinegar, damages the sheet.
G-Crystal: sheets and profiles from one manufacturer
G-Crystal Plastic Industries manufactures solid, twin-wall and embossed polycarbonate sheets in Egypt, together with the H, HCP and U profiles to install them, and exports to more than 60 countries. One supplier for sheet and profiles avoids thickness mismatches on site and makes it simpler to install polycarbonate roofing sheets right the first time.
- Thickness, profile and purlin spacing recommendation for your project
- Technical data sheet and 10-year limited warranty in writing
- Sheets cut to your roof length
- FOB or CIF pricing to Lagos, Mombasa, Jebel Ali or your port; see also polycarbonate sheet price per kg and per m²
Contact the factory: WhatsApp +20 109 599 0442 · info@gcrystal-pc.com
Sources
- G-Crystal technical data sheets (TDS): solid, hollow and embossed polycarbonate sheets, 2024 edition
- Industry installation practice for multiwall polycarbonate sheet (slope, end sealing, clearances and bending radii)


